Archive for the ‘Tutorial’ Category

Rust Dyeing Fabrics

Friday, December 28th, 2018


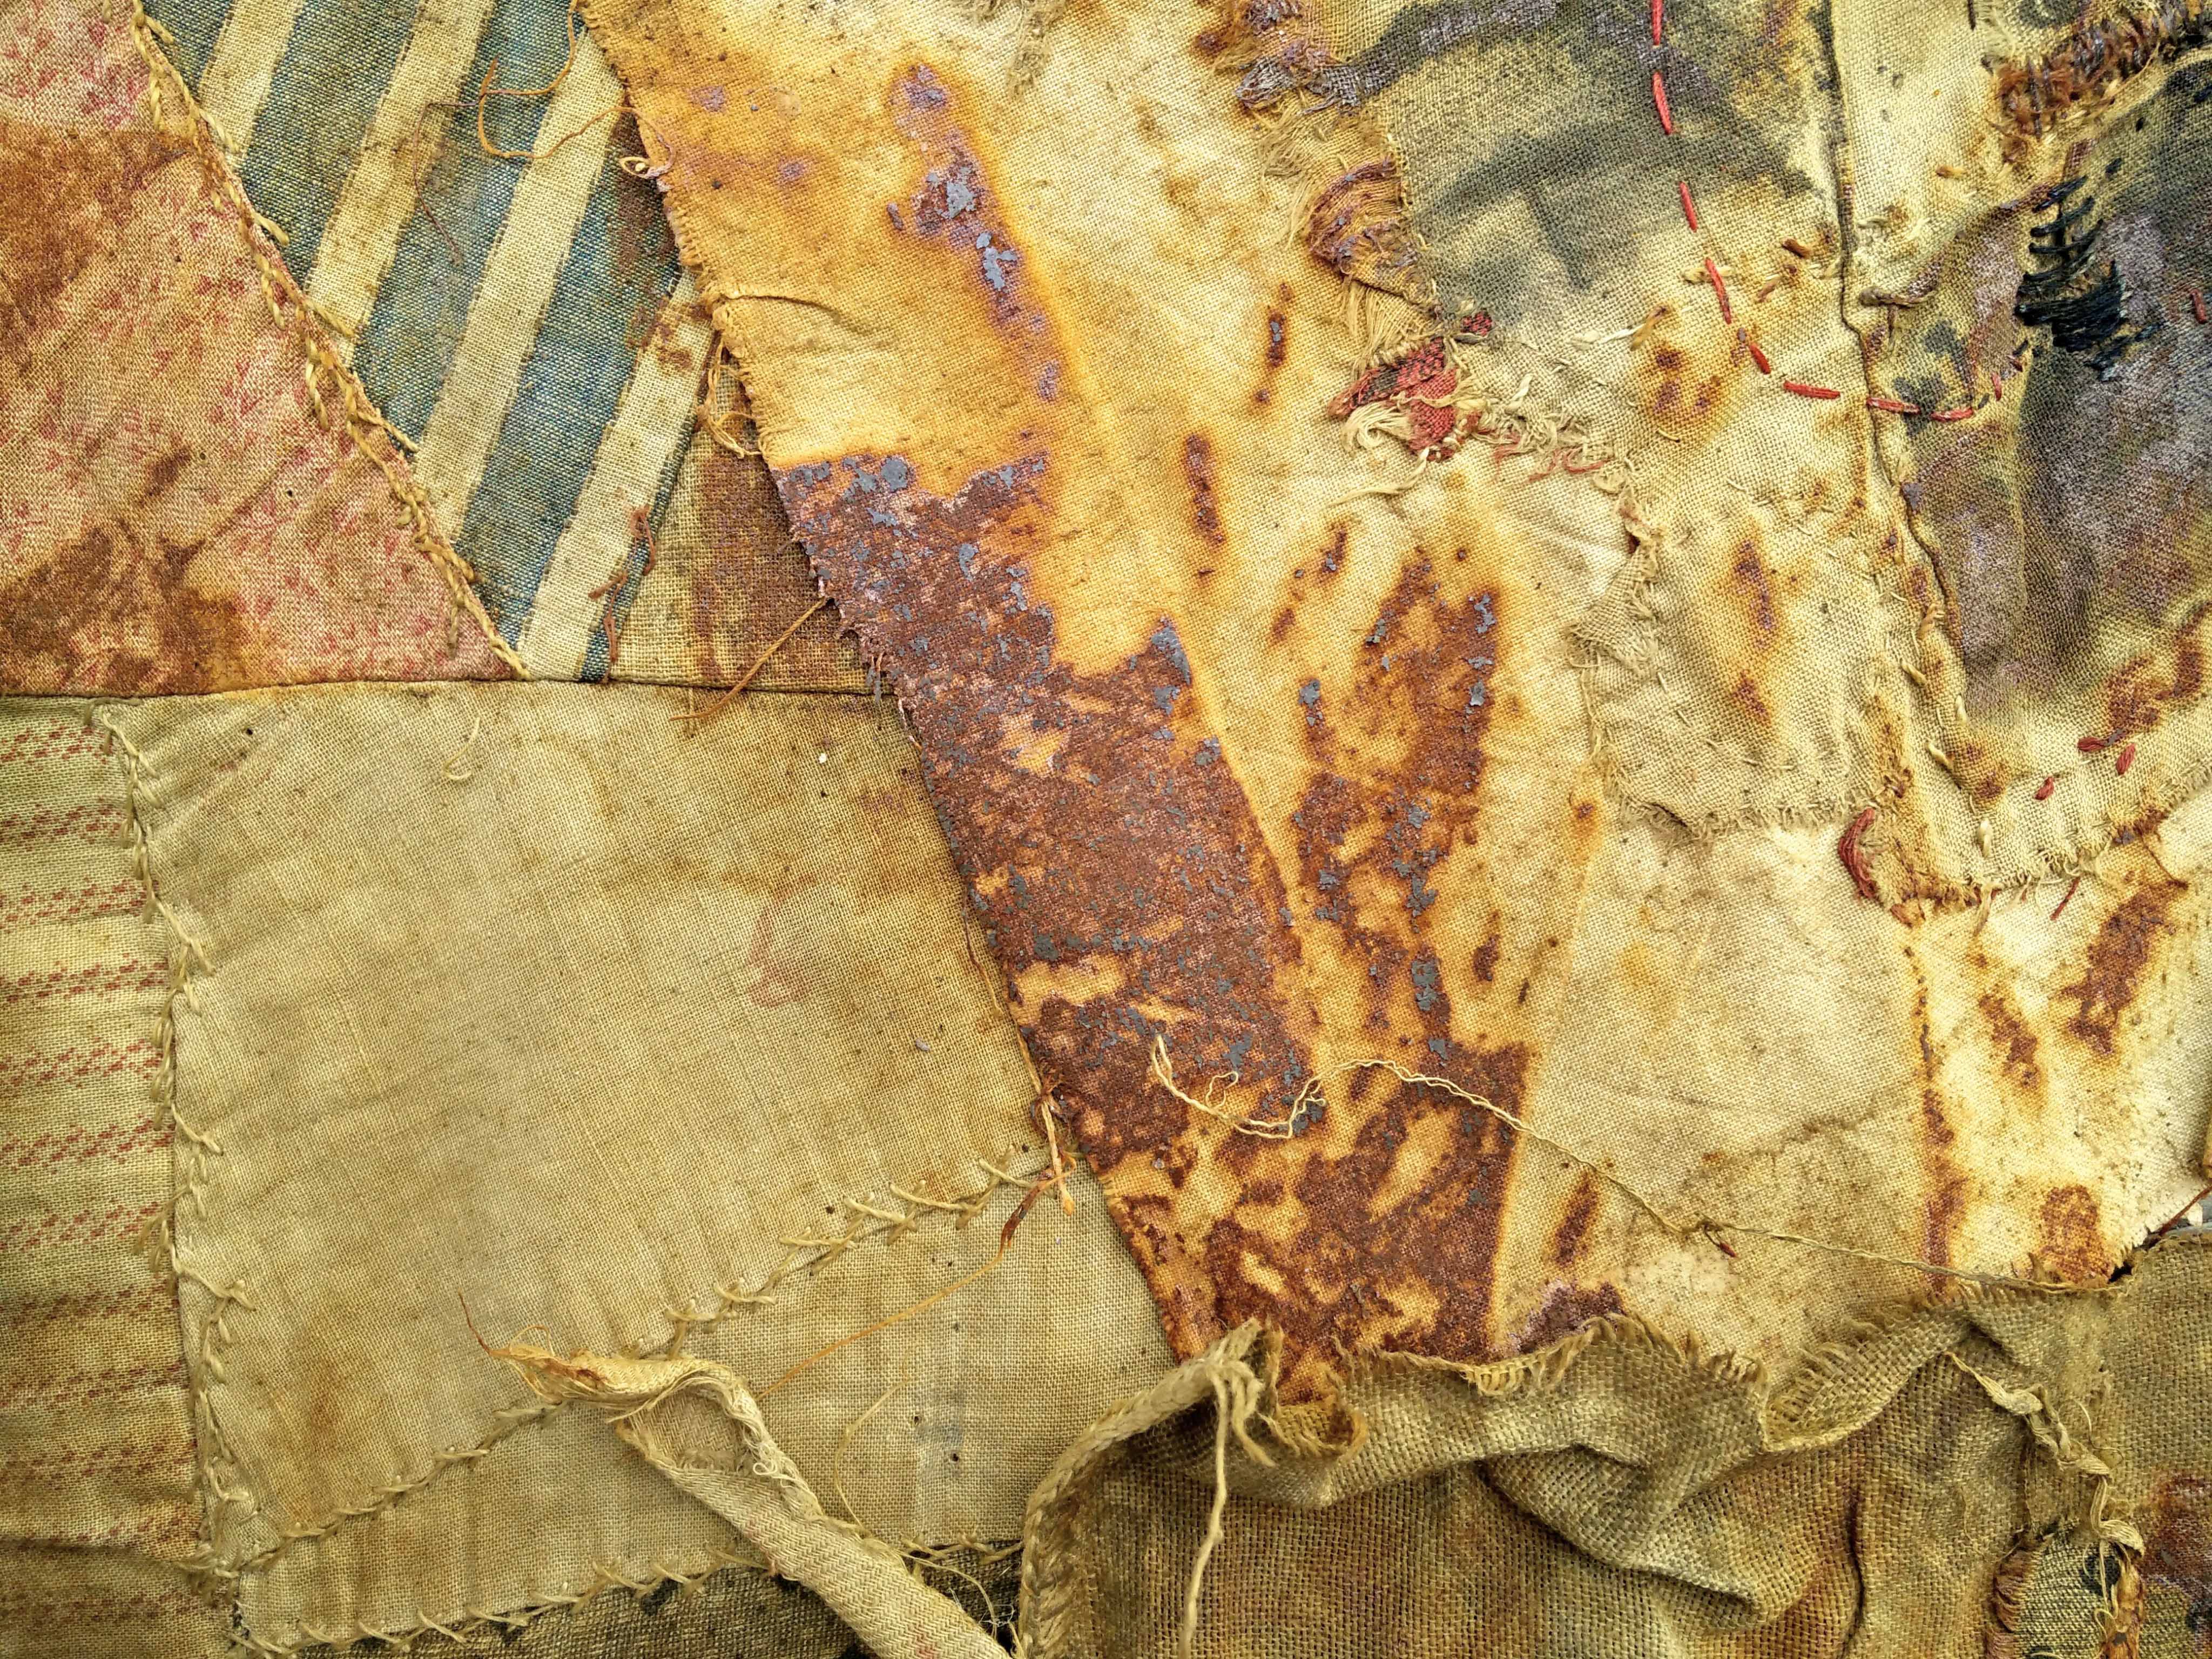
Summer in Australia is the perfect time for eco and botanical dyeing outdoors. During Winter, I like to save little bits of fabrics, lace and papers in a box for Summer dyeing. This is how I rust dye my fabrics….

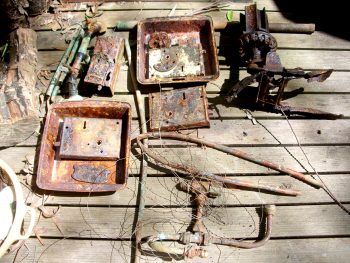
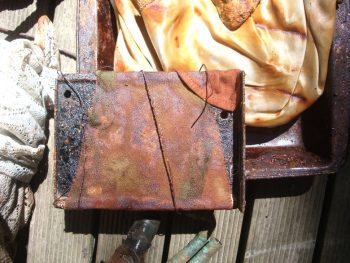
Many years ago, I collected heaps of metal junk to use for sculpture. As, I no longer weld, I now use the rusty bits and pieces that are scattered all over my property, for my dyeing projects.

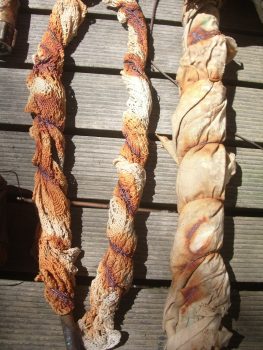
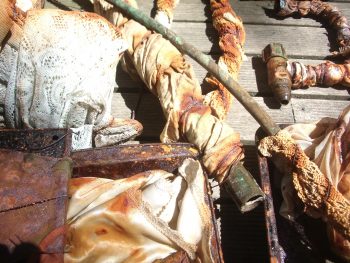
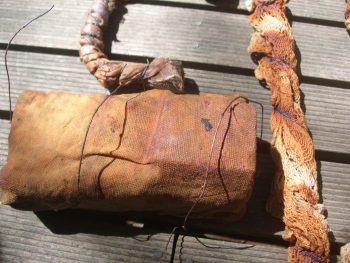
The gathering of the metal objects, wrapping them with the fabric spraying with vinegar and binding with rope and wire is quite relaxing. I call it mummy wrapping.


Rust Dyeing Fabric

MATERIALS:

Fabric: cottons silk… work best

Rusty metal objects: cooking pans, car parts, rusty nails, screws, pipes, copper objects

Wire, string, wool or rope just something to bind the fabric to the rusted item

Plain white vinegar

Rubber gloves

Plastic sheet or bags

METHOD

1. Gather all the items together wet your fabric and spray with vinegar.

2. Wrap the fabric around and around the rusted object as best you can.

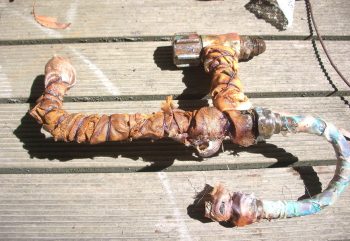
3. Make sure it’s tightly bound with the string rope or wire. Cover with plastic so it stays moist.

4. Leave and wait for the magic to happen.

5. This may take an hour or 2 or if you want deeper textures of rust a week or 2. Then un- wrap your beautiful rusted fabric.

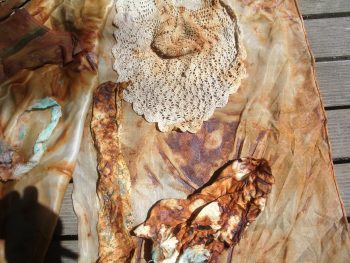
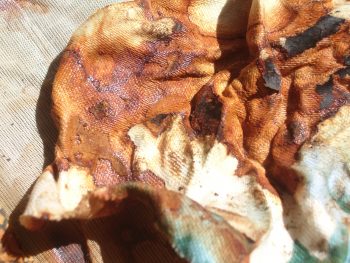
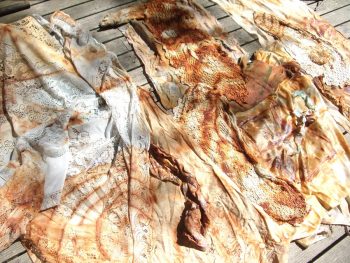
6. Once the fabric is dyed to the depth you want, soak for 30mins in warm water with a couple of tablespoons of salt to make the rust dye colourfast.

7. Wash gently in warm water with soap powder rinse dry and voila!

I also rust papers and larger pieces of fabric using a different method that I will share in a future post.

To see more of my free tutorials please go here

Homemade Gesso Update!

Tuesday, August 14th, 2018

Homemade Gesso!

Update 2018! Since writing this recipe in 2014, Ive been using this homemade Gesso recipe, for 14 years now and haven’t had an issue, with ageing, layers coming apart, seepage, changes in colour etc. on any of my artworks. I use it with both oil and acrylic paints. I also seal my papers with it when, making books, sewing on paper, paper for collage, painting with paint, inks etc. As to the quality, I find the homemade isn’t as white, but just as good quality, as professional artists Gesso. I also use store bought gesso too, if I’ve run out and for convenience. My version is more gritty, than store bought, but if you sandpaper in between coats, I find it’s not an issue. For me, this recipe is just as good as, the store bought and if you use archival PVA/Elmers glue, it will make it all the more stable, for longevity.

Homemade Gesso!

I love Gesso paint and use heaps of it in my work. It’s gritty, chalky and can be applied to artwork to give a translucent or opaque look. It’s also very expensive so I decided to make my own.


Gesso is used for many things such as a primer for canvas or on paper to give a good base for painting, drawing or mixed media work.  When making collage I use it as a gluing medium to stick on papers, in-between, painting and drawing layers.

The recipe below makes 2 litres of Gesso paint

( If not using straight away, this Gesso will last approx. 4-6 weeks)

Homemade Gesso

PLASTER MIX

1 cup Plaster of Paris or fine white plaster powder

1 cup of PVA or white glue (archival if available)

1 cup hot water

PAINT

3 cups white acrylic paint

UTENSILS

Container, cup and mixing stick or spoon

RATIO: 1-3

Plaster Mix 1 – Acrylic paint 3

Method

To make the plaster mix. Add the plaster to the hot water and stir ( Safety purposes: always add the plaster powder to the liquid, not liquid to plaster, as it will blow up into your face and always wear a dust mask)

Dust Mask

“Plaster of Paris” and cup

Hot water and mix

Next add the PVA or white glue, stir.

Finally add the white acrylic paint and mix. ( I used some acrylic powder paint I had and made it up with water) You can use any kind of acrylic paint or colour .


Result

I was very happy with the result. The gesso is translucent with the gritty bits I like. You can also do several layers of gesso to give a more opaque appearance. It covered my canvas very well with only 1 coat. When adding more than 1 coat you can sand in- between to give a really smooth surface for detailed work .

2 litres of Gesso

Gesso on stretched canvas

Gesso on paper


© 2014 – 2018, Jenny Davis. All rights reserved.

How to Stretch a Canvas for Painting

Monday, December 4th, 2017

When I first started painting, the thought of stretching my own canvas was frightening, but after a few attempts of stretching a canvas it came to me automatically. I was able to make canvases for half the price of store bought ones. Also, stretching your own canvas can trigger off the beginning of the creation through the hands on process of doing it yourself. Hope this helps.

Materials and equipment

Pre- made stretcher frame/ or self-made

Canvas material cut 10cm approx larger than your stretcher frame

Canvas staple gun

How to Stretch a Canvas

Lay your canvas on a flat surface wrong side up then lay your stretcher right side down on top of canvas. Pull the sides of your canvas up and round to the top of the stretcher.

DIAGRAM 1 Secure the 4 points with staples or tacks to create a diamond shaped wrinkle in the canvas. Check diagonals and adjust the stretcher for squareness before going further.


CANVAS DIA 1DIAGRAM 2– Secure the canvas to the stretcher with staples approx. every 6 cm. around the edge, working from the center points outwards. Pulling the canvas as you go. Continue working out to the corners in this pattern. Do not overstretch the canvas. When applying tension, the canvas pliers should not be forced to pull the canvas in place. The tension of course will become greater as you work towards the corners.

CANVAS DIA 2FOLD– the corners under; as neatly as you can, leaving no exposed tab that maybe caught and damaged. Staple or tack excess canvas that wraps around to the back of the frame.

HINT– Once finished and your canvas and is not as tight as you would like, fill a small spray bottle with luke-warm water and spray the canvas on the back. Once dry your canvas will be as tight as a drum. Happy painting!

Back to Outlook8studio  Tutorials

Homemade Gesso Paint!

Saturday, November 18th, 2017

I love Gesso paint and use heaps of it in my work. It’s gritty, chalky and can be applied to artwork to give a translucent or opaque look. It’s also very expensive so I decided to make my own.


Gesso is used for many things such as a primer for canvas or on paper to give a good base for painting, drawing or mixed media work.  When making collage I use it as a gluing medium to stick on papers, in-between, painting and drawing layers.

The recipe below makes 2 litres of Gesso paint

( If not using straight away, this Gesso will last approx. 4-6 weeks)

Homemade Gesso

PLASTER MIX

1 cup Plaster of Paris or fine white plaster powder

1 cup of PVA or white glue

1 cup hot water

PAINT

3 cups white acrylic paint

UTENSILS

Container, cup and mixing stick or spoon

RATIO: 1-3

Plaster Mix 1 – Acrylic paint 3

Method

To make the plaster mix. Add the plaster to the hot water and stir ( Safety purposes: always add the plaster powder to the liquid, not liquid to plaster, as it will blow up into your face and always wear a dust mask)

Dust Mask

“Plaster of Paris” and cup

Hot water and mix

Next add the PVA or white glue, stir.

Finally add the white acrylic paint and mix. ( I used some acrylic powder paint I had and made it up with water) You can use any kind of acrylic paint or colour .


Result

I was very happy with the result. The gesso is translucent with the gritty bits I like. You can also do several layers of gesso to give a more opaque appearance. It covered my canvas very well with only 1 coat. When adding more than 1 coat you can sand in- between to give a really smooth surface for detailed work .

2 litres of Gesso

Gesso on stretched canvas

Gesso on paper


To see this and more of my free tutorials, please go to  Tutorials I even show you how to make my large studio easel.


Time, Change, Erosion and Decay + Freebie Rust Dyeing Tutorial

Friday, March 17th, 2017

The process of transformation. Time, change, erosion and decay are qualities I like to celebrate. I examine and explore, the properties and possibilities, of my material and want to push the boundaries of something to get a deeper understanding.

In my latest project, I’m working with textiles over a 100 years old. I want to work with the worn and deteriorated textiles and collaborate alongside those, who in the past, so carefully stitched, mended and created, the pieces for comfort and warmth.

Each piece was once, carefully hand -stitched and now, breaking down and worn. I have very selectivity pulled apart and unpicked areas, and kept some intact.

Some areas of fabric, are so badly worn it breaks in my hands, so I have to reinforce it. Most pieces though are just left in their original state.

I then, like to push the process further with, natural & rust dying methods, mark making, hand stitching and painting with caste iron, botanical paints.

Numerous times, I expose the materials to the elements to experience the changes.

Getting to the essence of my material helps me to translate and describe its being. I rarely know the outcome of my projects and just go with the flow.

Wanting to know how to rust – dye?  Please see my  free rust – dyeing tutorial

Paintings & Gelatin Prints.

Sunday, March 15th, 2015

Paintings & Gelatin Prints. The backgrounds are experiments with gelatin prints I made on canvas with my homemade gelatin block. Inks and acrylic paint were added afterwards to the surface. (How to make a gelatin block and the printing process (tutorial)

Cimetière des Chiens Playground


Cimetière des Chiens Playground 1

Cimetière des Chiens Playground 2

Cimetière des Chiens Playground 3 (Sold)

Inspiration for the paintings.
A celebration to animals…Mapping and playing in the Cimetière des Chiens et Autres Animaux Domestiques in Paris. Opened in 1899 its a cemetery of dogs and cats and other domestic animals. Some of the cemetery’s residents are famous, such as Rin Tin Tin.

 The plots and plaques are just so lovingly decorated. My daughter and I like to spend time with the stray cats and dogs who wander in and out of the cemetery .The kind staff feed and shelter any stray animal by scattering little semi- enclosed boxes around the cemetery.

(My gelatin print tutorial here)

Homemade Gesso!

Thursday, January 16th, 2014

Update 2018! Since writing this recipe in 2014, Ive been using this homemade Gesso recipe, for 14 years now and haven’t had an issue, with ageing, layers coming apart, seepage, changes in colour etc. on any of my artworks. I use it with both oil and acrylic paints. I also seal my papers with it when, making books, sewing on paper, paper for collage, painting with paint, inks etc. As to the quality, I find the homemade isn’t as white, but just as good quality, as professional artists Gesso. I also use store bought gesso too, if I’ve run out and for convenience. My version is more gritty, than store bought, but if you sandpaper in between coats, I find it’s not an issue. For me, this recipe is just as good as, the store bought and if you use archival PVA/Elmers glue, it will make it all the more stable, for longevity.

Homemade Gesso!

I love Gesso paint and use heaps of it in my work. It’s gritty, chalky and can be applied to artwork to give a translucent or opaque look. It’s also very expensive so I decided to make my own.


Gesso is used for many things such as a primer for canvas or on paper to give a good base for painting, drawing or mixed media work.  When making collage I use it as a gluing medium to stick on papers, in-between, painting and drawing layers.

The recipe below makes 2 litres of Gesso paint

( If not using straight away, this Gesso will last approx. 4-6 weeks)

Homemade Gesso

PLASTER MIX

1 cup Plaster of Paris or fine white plaster powder

1 cup of PVA or white glue (archival if available)

1 cup hot water

PAINT

3 cups white acrylic paint

UTENSILS

Container, cup and mixing stick or spoon

RATIO: 1-3

Plaster Mix 1 – Acrylic paint 3

Method

To make the plaster mix. Add the plaster to the hot water and stir ( Safety purposes: always add the plaster powder to the liquid, not liquid to plaster, as it will blow up into your face and always wear a dust mask)

Dust Mask

“Plaster of Paris” and cup

Hot water and mix

Next add the PVA or white glue, stir.

Finally add the white acrylic paint and mix. ( I used some acrylic powder paint I had and made it up with water) You can use any kind of acrylic paint or colour .


Result

I was very happy with the result. The gesso is translucent with the gritty bits I like. You can also do several layers of gesso to give a more opaque appearance. It covered my canvas very well with only 1 coat. When adding more than 1 coat you can sand in- between to give a really smooth surface for detailed work .

2 litres of Gesso

Gesso on stretched canvas

Gesso on paper


Update 2018! Ive been using this recipe for 14 years now and have had no issues with ageing , seepage. I use it with oil paintings and acrylic artworks. I also seal my papers with it when making books, sewing paper for collage, painting with paint, inks etc.